Showing posts with label Painting Competition. Show all posts

Monday, 29 July 2019

Everchosen - I'm a Winner!


Just a quick update post to say that my Battle Sister made it through, and that I came first in my local competition! Next up, I'll be going on to represent the store in the online vote.

Just for fun, I also entered the open category, and snagged 2nd place with my 40k Skaven Dragoon conversion. All in all it was good fun, and I think I'll probably enjoy going into the online vote too. I'm not expecting much as I'm sure the serious golden demon guys are going to be out in force, but It's just nice to get a little bit of recognition, and it is a very big global stage, so it should be interesting.

I had a bit of a look around the internet, and I think quite a few people entered Sister Amalia into Everchosen, so I'm sure I'll be up against some very directly comparable models in the next round! (I've seen a few that made it through), so at least I can see how I do compared to them!

Winning was quite fun too, as I was presented with a mysterious golden envelope. Unfortunately, it just continued instructions on how to enter the second stage of the competition, and wasn't stuffed full of gift vouchers!


Saturday, 27 July 2019

Sister Amalia Novena - Everchosen Painting Competition


I'm entering the Everchosen painting competition today, so I thought I should post my work on the blog too. It's been a while since I last posted on here, but I have been working on some miniatures, so with any luck, more posts should be coming soon.

This was a cool model to work on. I wanted to do something for the competition, but was undecided about which model to use. I've always liked sisters of battle (and have an old army of the metal ones at home too), so I knew I was going to pick up the first ever plastic one when she came out. Given the timing, I figured that she would make a good entry for the competition too. I also often end up painting female models for competitions. I think it's because I spend so much time painting burly dudes that by the time I get to picking something "just for fun" I'm in the mood to switch it up a bit.


Build-wise, I made a few changes. I took away her bolter and added a sword from a Mechanicus infiltrator. Mostly to make her look more interesting for the competition, but it is a cool part and it wasn't that hard to do. Other than that, I added the archway. After painting, I added some "broken glass" to the arch too (seen at the bottom from the back). There are a few bits scattered on the floor too, but they aren't that obvious and don't really jump out in photos. Nevertheless, I think of it as a bit of an "Easter egg" for anyone who bothers to look at her long enough. The arch is the side struts from one of the citadel building kits, just cut to shape and re-joined at the top and bottom.


As far as paint is concerned, I went full NMM. I'm honestly not the best at non-metallic metals, but that's pretty much why I did it. I always try to push myself with competition entries, so it was an obvious choice. I laid down the base colours and blends on her armour and sword with the airbrush, but after that it was all good old-fashioned brush work. I also added some fairly subtle OSL in the form of the candle and lamp. I'm quite happy with the candle, but I feel like I could've brought the effect through to the actual model better. It doesn't really matter though as I'm happy enough with it as a bit of throw-away wow-factor.


That probably just about rounds it up. Everchosen is decided by public vote, so who knows how this thing could swing. I'm sure I'm  not in with a look-in for the grand prize as the really serious painters are sure to be out in force. A local victory would be cool, so I could at least make it to the online voting stage, but I guess we'll see.


Thursday, 18 April 2019

The Captain's Log Returns - Oldhammer Lizardmen Project Begins

When I first started this blog, I often had odd editorial's filed under the "Captain's Log" tag. As time has gone by, I've dropped a lot of the odd little articles that I used to do, some more due to a lack of time than anything else. Some I'll bring back with time (my terrible fiction will never die!), but it seemed a fitting title to use for this little snippet.

There have been a few years that I've considered entering one of GW's Golden Demon competitions, but I never really had a project in mind. I'm a good painter for sure, but I'm not really up to the standard of those people who spend their whole hobby in search of painting perfection and spend hundreds of hours on every model. The truth is that I don't have the stomach for it, and I've got  enough other things to be getting on with that I don't have that kind of time. With that in mind, my chances of winning anything are pretty low.

That said, it's one of those things that I'd enjoy doing, and would be a great place to test some techniques and work on some skills. I've often thought that it would make more sense to enter something that was more of a personal project - something I'd create to own and enjoy.

So, a few days ago, I got to thinking about my first army - 1990s Lizardmen. I've wanted to revisit them for a whole long time, and to have a go at stripping and re-painting some of the most characterful miniatures of the day. I know that most people probably have no recollection of what the sculpts even looked like back then, but a lot of the metal models were actually really nicely formed and had a lot of character. They'd also make a great palette for experimenting with bright tropical colours and jungle flora, which is something I've never done.

I also absolutely loved the diorama that was made for the Armies Book in 1997. As a kid, I spent what probably amounted to weeks of my life staring at pictures of that thing. It was just amazing at that time, and I recently had the chance to see it in person at Warhammer World too. I started thinking about the 40k Shadowsword that I painted, which was sort of a childhood dream since Epic came out, and I thought - why not really live the dream?


As most people don't remember the models of the time, here's a picture of that famous Diorama featuring them. 


Taking the basic idea, I thought that I'd have a go at making a prehistoric (get it, because they're so old) Lizardman diorama. Something like a jungle scene - a rocky temple backdrop for 2 sides of a base with a sort of central pond. Maybe a waterfall. My old Slann could be relaxing in a temple thing with a view of some type of fish hunting going on below. The idea would be relaxation, they've earned their retirement by now and deserve to enjoy it! I've got pretty much every model from the generation, so a Terradon sailing by somewhere in there, and a submerged Salamander would be easy enough. I'll probably add a bit of a sub plot in with some baddies sneaking up, but I'm still working on that part.

So, earlier today, I clambered through the darkest cupboard of doom. After being assailed on all sides by forgotten childhood memories, Goosebumps books and an old Nirvana cassette tape that nearly bludgeoned me to death; I finally reached my prize. A big box of ancient Lizardmen!

Upon opening the box, perhaps because of the bludgeoning, I became almost convinced that I was in an episode of American Pickers. Yep, I was junk drunk and surrounded by rusty gold. It had the patina, and the price was irresistible!

Oldhammer for the Oldhammer God! I won't be able to use everything, but I wanted plenty of options!


Anyway, I grabbed a bunch of the good stuff and prepped it for stripping. What happens next, who knows, who cares, but at the very least, I expect to enjoy painting a few very deserving models. With any luck plans will work out and I'll get a cool piece I can keep and display with all my favourite childhood models in it - and that'll be pretty priceless. I might even put in a few in-jokes (that Slann needs his Forbidden Rod and Amber Amulet combo for sure!). If it goes well, I'll enter it in Golden Demon just to put a smile on some faces that remember the good old days.


Original metal skinks! Collect the whole set. I know I did!
In some ways, these are the models that I owe a lifetime of fun to. They had hundreds of battles back in the day; probably thousands. I think it's time they retired with the full battle honours they deserve!


Friday, 1 June 2018

E2046 GK Competition 2018 - Anime Figure Complete!

With about a month to go till the big competition, I decided it was time to defend my second place title from last year's event. It turned into a bit of a rush a week or two before the deadline (which passed yesterday), but I made it in the end. Here are the final results:


If you missed my efforts last year, you're looking at the Champ! The best man here, the best man there, and the best man anywhere.... well that sure is the plan for this year anyway. I actually took second place last year, and I figure I have to at least turn out for this year's event.

So yeah, rewind a year, and I was entering the E2046 GK competition for the first time. They're a Chinese company that make resin "Garage Kits", which is basically code for resin anime girls you build and paint. There are also robots and stuff too. I got the second place prize with my Rage of Bahamut figure that I painted in an uncharacteristically marble effect based weathered style that I think won me a lot of interest as it is very different from the style that most of the figures are usually painted in.


Last year's entry. She is a big figure at about 8" tall.


I wanted to do something equally interesting and different this year, so I opted to base my scheme around the idea of creating a strong OSL look from two light sources (OSL is Object Source Lighting, and basically means replicating the look of a light source hitting a model using paint).

Handily, I have quite a few of these figures to chose from. I had bought a few when I first entered, and the number is now out of control, as the win bought me $250 worth of the resin ladies in store credit. Yes, I have a few spare now to work on...

I have to admit that I wasn't sure what to do until I got the idea fro the OSL. Handily, I had another figure from the same series as last year's entry that was really cool and would be perfect for the job. Getting these models ready for paint is half the battle, but I cleaned her up and built her into sub-assemblies. This is something you always have to do. A lot of people work on all the parts individually and then glue them all together at the end, but I prefer to get them into about half a dozen chunks. I normally divide them up this way based entirely on what I want to airbrush and what I think will make it easy. Never build them fully and then paint them thought as they're very big and delicate and you'd just never be able to reach to get the details.

Anyway, for the first two parts, I painted the base and the legs. I put a pin though the bottom of the foot to hold the model together and it's nice and strong now. Basically what I was going for is for it to look like the crystals are glowing, and I think it has come out well. I've tried to keep most of the model quite dark so the effects will really jump out, but this is new ground for me.

The basic technique was that I assembled the model completely using pins. I then undercoated it in black and then went in with white on the airbrush and highlighted just where the lights would be. Then, when I disassembled the model for painting I had a guide of the rough area where I wanted the lighting effects to be... in theory.

The basic areas where the light would be hitting were defined early on with the undercoat.


After the legs, I worked on the torso, head, hair, arms and wings in that rough order. The whole time, I tried to keep the highlights going in one direction; straight towards that orb. To complicate matters, I ended up doing the yellow gold parts Non Metallic style as it gave me better control of the reflections and the lighting effects.

I've done some glow effects and things like that before, but these were just after-effects added onto a model that I had painted as usual. For this figure, I angled all of the highlighting on every piece specifically to crate the lighting effect, so for example the handle of the sword is a much darker colour than some of the other gold details as it would be less illuminated by the light from the orb.

Overall, I'm happy with how she came out. It was new ground for me, and there are a few things I will try to improve on when I try this technique again later. One thing that is really important is actually the background (literally the backdrop behind her) as if it isn't black the effect doesn't come across as well as other light sources tend to interfere. It's worth bearing in mind if you're planning a diorama or something.

No camera trickery, I just painted a blend all the way from black to light grey across her body! (thank God for airbrushes!)

Anyway, wish me luck for the competition. We'll see if I get de-throned this year or if I'll be taking another title home in a few weeks once the judging is completed!

Wednesday, 5 July 2017

GK Contest 2017 - I'm the Winner! (2nd place, figure category)


I woke up to some exciting news today. While I was asleep last night, it seems that I was also busy being judged for my painting abilities somewhere in China.

To cut a long story short, my figure placed second in the main figure category (narrowly squeezing past hundreds of other entries). The best part? probably the $200 prize, although really just finally getting a win somewhere was well worth it, after a few dismal showings at Salute!

I'll add a link to the main gallery http://www.e2046.com/contest/2017/, which now features all of the winners at the top. The first place position in my category was well deserved, and I don't even want to know how many hours they spent on that massive dragon and all the figures and bits.

In other news I have plenty of 40k stuff coming up soon. I'm planning to run another full week of Chaos posts next week showcasing all of the things that I've been working on since 8th Edition came out, so stay tuned for that one.

Cheers

Tuesday, 13 June 2017

E2046 GK Competition 2017

Remember that Anime figure that I painted up a couple of months ago? No? Well, I'll add some pictures to jog your memory.


Anyway, I liked her so much, that I decided that I'd put some pictures into a massive online competition being run by the Chinese resin cast figure company E2046. The competition is a pretty big deal for enthusiasts of these kinds of figures, and literally hundreds of hours have gone into some of the entries. It's all done with photos too, which was a bit of a novelty, but I guess that the main drive is to promote the hobby and their business. There are some big prizes too, with a $500 USD prize for the winner and over $2500 up for grabs in total. It is all in store credit though, but still it certainly puts Golden Demon to shame!

The competition is run in 3 categories. Figure, is for single resin anime style figures. The second category is "Mecha", which is pretty much the Gundam category or giant robots to most people. The third is the always impressive, but obviously insane Diorama category. The reason that I say it is mad, is because the smallest figures they make are about 1/8 scale, so painting up more than one is literally several months of work.

Anyway, my entry is now in the gallery and all I have to do is wait till the 14th, when the initial cut will be made and the finalists will be selected. Here's hoping for a good result!

My Gallery


On a side note, I painted this thing a few months back , and I submitted the gallery about 6 weeks ago, so the competition feels a bit distant, which is something I've actually really enjoyed as it has been nice and relaxing.

Sometimes looking back to the beginning, I wonder where I found the energy to finish it!


An angle that didn't make it into the final gallery. I like it though, she looks kind of annoyed from down here.


The Competition, main gallery


Sunday, 30 April 2017

Inquisitor Greyfax - Salute Painting Competition 2017 Entry


Well, the competition ended in defeat. I'm not too upset though as I still got a really nicely painted model out of it for my collection! (and what perhaps might even be the nicest Greyfax in existence - she hasn't been out for that long...)


It was a daring piece for me - with a lot of Non-Metallic Metal technique used throughout, and in the end I was quite happy with the result that I achieved. Don't get me wrong, there's always room to improve, but I was happy with the blending and the overall look. I think I fell down on the small details though, as I just couldn't be bothered to spend as long as perhaps I should on the smaller parts (like some of the cloth and grey metallics). I guess I only have myself to blame there. It was the first time that I've done a whole model in NMM, so from that standpoint I think it was a real success.

I have to admit that I think that a lot of the time Non-Metallic Metals are a real gimmick. It's more of a painter's technique, not particularly for the battlefield, and in all honesty real metallic paints almost always look more realistic. That said, the technique makes for some awesome looking power swords, and really pushes blending to another level.

Even though I failed, I learned a lot with this piece, so who knows where I'll be at when the next year rolls round. I think the Sci-fi single mini is a hard category too; with a lot of entries compared to other categories (next year I should probably enter the squad category or something where I might have a bit more of a chance). You never know though, my techniques have come on a lot in the last year, so I might just manage it by next year if I'm lucky!

The other thing I hadn't realised were how different the judging criteria were from what I had expected. I've got a photo of them below. I was particularly surprised by the weight given to emotional impact and telling a story, as to be honest, I hadn't considered it at all when working on the piece. Definitely worth remembering for next time though, as the criteria are surprisingly esoteric. I'll add a picture of the criteria below (which I only read on the day!).


Anyway, I've never been one to stew in defeat, so I hope you enjoy the pictures. I just need to think of something to enter next year that has emotional impact now.

Saturday, 22 April 2017

Salute 2017 - Pre-show Preamble


Well, the fated day is upon us and I'll be well on the way to the venue by the time this post goes live.

True to form, I finished my painting competition entry with mere seconds to spare. It might not be perfect enough to win, but I'm happy with it, and I think I exceeded my original goal, which was to expand my knowledge of Non Metallic Metals and to have a go at the technique in detail. So wish me luck with that.

I'm keeping the final product under wraps, but you can see it in person in the sci-fi single miniature category. I even managed to nab a plinth to put her on in the end, so I was chuffed about that. I actually hate plinths in principle - the model comes on a base already! I wanted to be taken seriously though, so for £3.99 I figured it was worth it.

A picture from where I was at a week ago.


Personally, I'm hoping to get a lot of shopping done too as there are literally hundreds of retailers at the show; meaning that it's a smorgasbord of deals. Last year I had great fun shopping, so I hope it'll be as good this year. One of the great things is the opportunity to go to some shops that normally only exist online; like Anvil or the always popular Forgeworld. There are also a lot of terrain manufacturers there with a lot of stuff that you don't see every day. Coupled with the participation games and displays, it should make for a hell of a day out.

Monday, 17 April 2017

Salute Painting Competition Panic!

With less than a week to go till the big event, I'm determined to be finished on time; although the jury is still out on what the quality of my entry will be in the end!


For those who missed it, Salute is the biggest independent Wargaming convention in the UK. Fairly obviously, this means that the painting competition is the second biggest around (after Golden Demon). A few months back when the Triumvirate of the Imperium was released, I decided to try my hand at painting up Greyfax for the competition. If you missed it, the project was designed to push the limits of my skill by stretching my painting to the max. For some insane reason, I decided to paint her wholly in Non Metallic Metals (a technique that uses regular colours to replicate the look of metallic objects). I even did a tutorial on the technique as I understood it. My intention was always to enter the finished mini in the competition when the time came.

So, now the time has come and I'm frantically trying to finish. On the upside, I have a doable amount left. On the downside I still have a long way to go. At this point, I don't expect to place in the competition, but I'm still determined to at least finish. My goal was to try and make the cut for the finals, so fingers crossed for that!

The Condemner Boltgun in particular mocks me with its unfinished yellowish mediocrity!


The problem is that the more I look, the more I see that I need to do! Oh well, no sense in complaining about it now... better get back to painting...

If you missed the article on painting NMM, you can find it here:

http://tabletopapocalypse.blogspot.co.uk/2017/01/how-to-paint-non-metallic-metals.html

Friday, 27 January 2017

How to Paint Non Metallic Metals


As part of my latest project, I've been working on painting Inquisitor Greyfax in Non Metallic Metal Gold. As a relative newcomer to this technique, I thought I'd share the insight I've managed to get so far and a few of the techniques I've been using to pull it together. I had initially planned this to be a fairly succinct article, but it has grown into a bit of a Behemoth as there are so many facets to the technique; so you'd better get your thinking caps on and your specs ready for this one!

Initially, I found one or two tutorials online to get an idea of how the technique is done. These varied greatly in quality, but the one that I found most helpful was:

http://razzaminipainting.blogspot.co.uk/2016/07/non-metallic-metals.html Darren Latham's blog, he doesn't post very often, but it's very interesting, well worth following especially for painters or anyone who is interested in Games Workshop.

It was especially useful, not only as good reference material, but also as he discussed the actual paints and colours used. From the tutorial, it was obvious that the keys were smooth blending (fairly obvious), contrast from dark to light, and adding pure white highlights in relevant places (probably the hardest parts). The whole pattern of shading had to be carefully considered as well if it was to look realistic. I won't bother to go into too much detail (ok some detail is covered later), as these points are discussed ad-nauseum all over the internet and for my part I'd rather talk mechanics, blending, and how I did it!


The other tutorial that I used was from Angel Giraldez's Painting Miniatures from A-Z Part 2. He covers creating a range of Non-Metallic colours using an airbrush and brush style. Unfortunately, you'll have to buy the book if you want to know the ins-and-outs of it as I'm not sharing his copyrighted material. Needless to say that my own method below was inspired by his book and draws on the techniques I built up after reading both volumes and experimenting with his style (which I've since combined into my own style as they were surprisingly compatible; a rare thing for me as I find a lot of painting tutorials clash with my own style and techniques).

I don't have exact paint names for a lot of this, as I did a lot of mixing and improvising as I went, although if you do want to follow a set of specific colours, they're listed on Darren Latham's blog and I was basing my work on his. It's important to note that there is no way to apply this technique "by the numbers" anyway as any application is going to take considerable artistic skill (and I'm still learning too). Even with those restrictions, I'm going to break things down as succinctly as possible and I hope people will find it some help, or at least interesting.

Method 


Airbrush Blending

I used an airbrush, but it isn't necessary. If you don't have one, the same colours can still be applied, but you'll have to blend by hand from the start. I've written a section on blending later on, which I hope will be of some help. It'll just take a long time!


  1. I started with a coat of black primer (pretty standard for most models).
  2. I then added another layer of primer. This time with the airbrush using Vallejo Grey Primer. This stuff is almost white and I sprayed downwards and from the directions that light would shine in. This served 2 purposes; first as a pre-shade, but second to help me see the volume of the areas I was working on as well as to demo the lighting effect/highlights that I would later add. It sounds like a superfluous step, but it really did help me process the effect I was trying to create.
  3. After that excitement, I added thin a basecoat to the whole model with the airbrush using a ruddy brown (a mix of red, black and Vallejo Dark Flesh). This would give me a base to work from for the darker tones.
  4. Progressively mixing in lighter colours (Pale flesh) I layered lighter browns with the airbrush. 
  5. This was following in the footsteps of my favourite internet tutorial that said to start with browns and then glaze in the yellow tones. As I worked I added in some more yellow to the mix, but it was still very woody.
  6. I finished the initial blending with some tentative white highlights using the airbrush.
  7. The moment of truth came next as I glazed the model with pure yellow - again using a thin mix and the airbrush at a good distance. This was a nail biting step as if I got the mix too thick it'd obliterate all of that blending.
  8. To finish up the airbrush work, I came back in and did a final spot highlight using pure white to create points of light on the armour.
And with that, my quest came to an end .... or so I'd like to say, but honestly it was just getting started and I switched to the regular paint brush and set to work. To make it look like less work though, I'm going to start numbering again. I bet you feel motivated now...

Paintbrush Time


  1. In order to enhance the contrast, I painted Rhinox Hide round all of the edges of the armour. This gave visual definition between the plates and is a bit of a classic technique from Angel Giraldez's work (always then combined with a sharp highlight). I used a mix of 1/3 Rhinox Hide to 2/3 Lahmian Medium for this as I wanted to keep the paint nice and pliable.
  2. With a series of glazes, I set to work improving the contrast. The airbrush had worked well, but the colour gradient between dark and light wasn't sharp enough yet. I blended with various browns and reds to darken the plates in the appropriate places. The reds also helped to enrich the tone.
  3. I used a thin glaze of yellow over the lighter areas in order to adjust the tone (to make it more yellow and vibrant, rather than brown). This can be as strong, or not as you see fit, depending on the end result you're going for.
  4. After the blending (which I'm still adjusting even now, so I keep going back to this stage really, but in the ideal world...) I added a sharp highlight of pure white to the reflective surfaces to add the "shine". The first layer of white was glazed in with a mix of white and Lahmian Medium, with the second added using pure white to get a stronger tone.
If you're still reading this, then kudos, you might actually have enough attention span to make this work. I know I'm getting tired just talking about it, but the mini isn't done yet and there'll be endless layers of paint till we're done. I'm still adjusting mine as we speak (that makes it sound like I have my hand down my pants... but whatever). It really is all about hitting those highlights and going for contrast though, so keep at it. With that in mind, I think I should add a bit to the end on techniques and stuff.

Blending


Everyone paints differently, so I can't hand any technique to you on a platter, but I can give you an idea of how I blend. You may have noticed my fairly heavy airbrush use these days. I use an Infinity CR Plus airbrush with a cheap compressor and Vallejo products (both thinner and cleaner). This allows me to lay down a highlight as fine as about 1mm radius; although control at that level is still a nail biting experience. I know I always advocate it, but if you are serious about airbrushing, Angel Giraldez's Painting Miniatures from A-Z books are a good source of knowledge; although they don't tend to cover too much in the way of mechanics, but mostly just walk you through how he goes about painting various colours as well as stuff for NMM etc. I bought the first book about a year ago, and haven't looked back since (although I had no idea what I was getting myself into at the time).

Anyway, I use the airbrush to lay down a basic blend (this is possible with a brush, but would take a lot longer). After that, I use a series of Glazes to blend the colours together further and to change the tones. A Glaze is a bit like a wash; only thicker. Instead of water I use 2 products, Lahmian Medium and Vallejo Glaze Medium. Interestingly, I've found that these both have very different properties, but both can be exploited depending on the situation. Both are a medium, which essentially means that they're paint with no pigment in it. This might sound like something that would be of no use, as they're completely clear, but they're both incredibly helpful products. Mixing the medium with regular paint lets you create a very thin translucent layer that doesn't run into the gaps like a wash or leave stains where it dries. It will allow you to "tint" the base layer with a colour that applies evenly across the surface. With multiple layers you can build up a completely smooth blend (it just takes a lot of time and patience!).


Lahmian Medium acts very much like GWs other paints; it dries quickly once applied and a thick mix can leave a strong edge. I tend to use it when I'm going for a stronger look, or where I want to be very direct about what I'm doing, but just want to get a smoother result; like when I did the dark edge on those panels, or later the white highlight.


100% Acrylic resin? I have no idea what that means, but rumour has it it'll make you a sexual Tyrannosaurus, just like me...

Vallejo's Glaze Medium is far more interesting. As well as the same thinning effect, it retards the drying time of your paint incredibly. A thin coat will dry in about 2 minutes (compared to a few seconds). I've had paint mixed on my pallet with this stuff that has still been fluid days later (and no I don't ever use a wet pallet, so its just out in the air). The advantage of this is that I can add a layer of paint and while it dries I wash my brush and go in (with a just barely moist brush) and adjust the paint before it dries. This allows me to blend it in so that it leaves no "watermark" where the edge of the paint lies. Essentially it's completely smooth and seamless, but takes a very long time to build up the colour. For the purpose of my mini, this is the technique I used to adjust the blending and contrast after the airbrushing was complete.

The other thing to consider is the direction you're moving your brush in. Paint tends to pool and be the strongest when the brush leaves the model (especially with these thin glazes), so you should be dragging the brush towards the point where you want the colour to be the strongest. It's a bit of an odd one as it seems to be counterintuitive; you'd think that the colour would be strongest where you first made contact as logically you'd think that would be where the most paint was deposited. To make it a bit simpler, if I was shading, I'd start at the middle of the panel and drag down towards the darkest point.

Lighting


As it is so central to NMM, I thought a quick discussion of light and direction would be appropriate. If you made it through my guide above (or are still even awake by this point), you might remember that layer of grey primer at the beginning, which I used to help me establish this. Anyway, generally you'll be thinking of creating multiple virtual light sources. By that I mean, you don't really have to shine a bunch of lights on the mini, but think of the direction that light would be coming from around it. In some ways I envy 2D painters as they can add light entirely from one direction, whereas working in 3D that'd leave half the mini pure black - not really ideal, but it does demonstrate the idea - that the colours will be stronger where the light hits and darker where it doesn't. While a mini, having a "dark side" isn't exactly ideal, it does give you some idea of how to work the shadows. For mine, the darkest parts would be the inner surfaces of the legs as even with 4 imaginary light sources (roughly evenly spaced around the mini) that area would still be dark. At this point I think I may have actually gone mad with all of this stuff as reading it back I sound like a lunatic, but anyway you'll either get what I'm saying or not. This stuff is hard to explain, but that's basically it. After that it's mostly that the light will hit any ridges, or bits that stick out.

I drew this terrible diagram of where the highlights are on my phone using a work in progress photo:


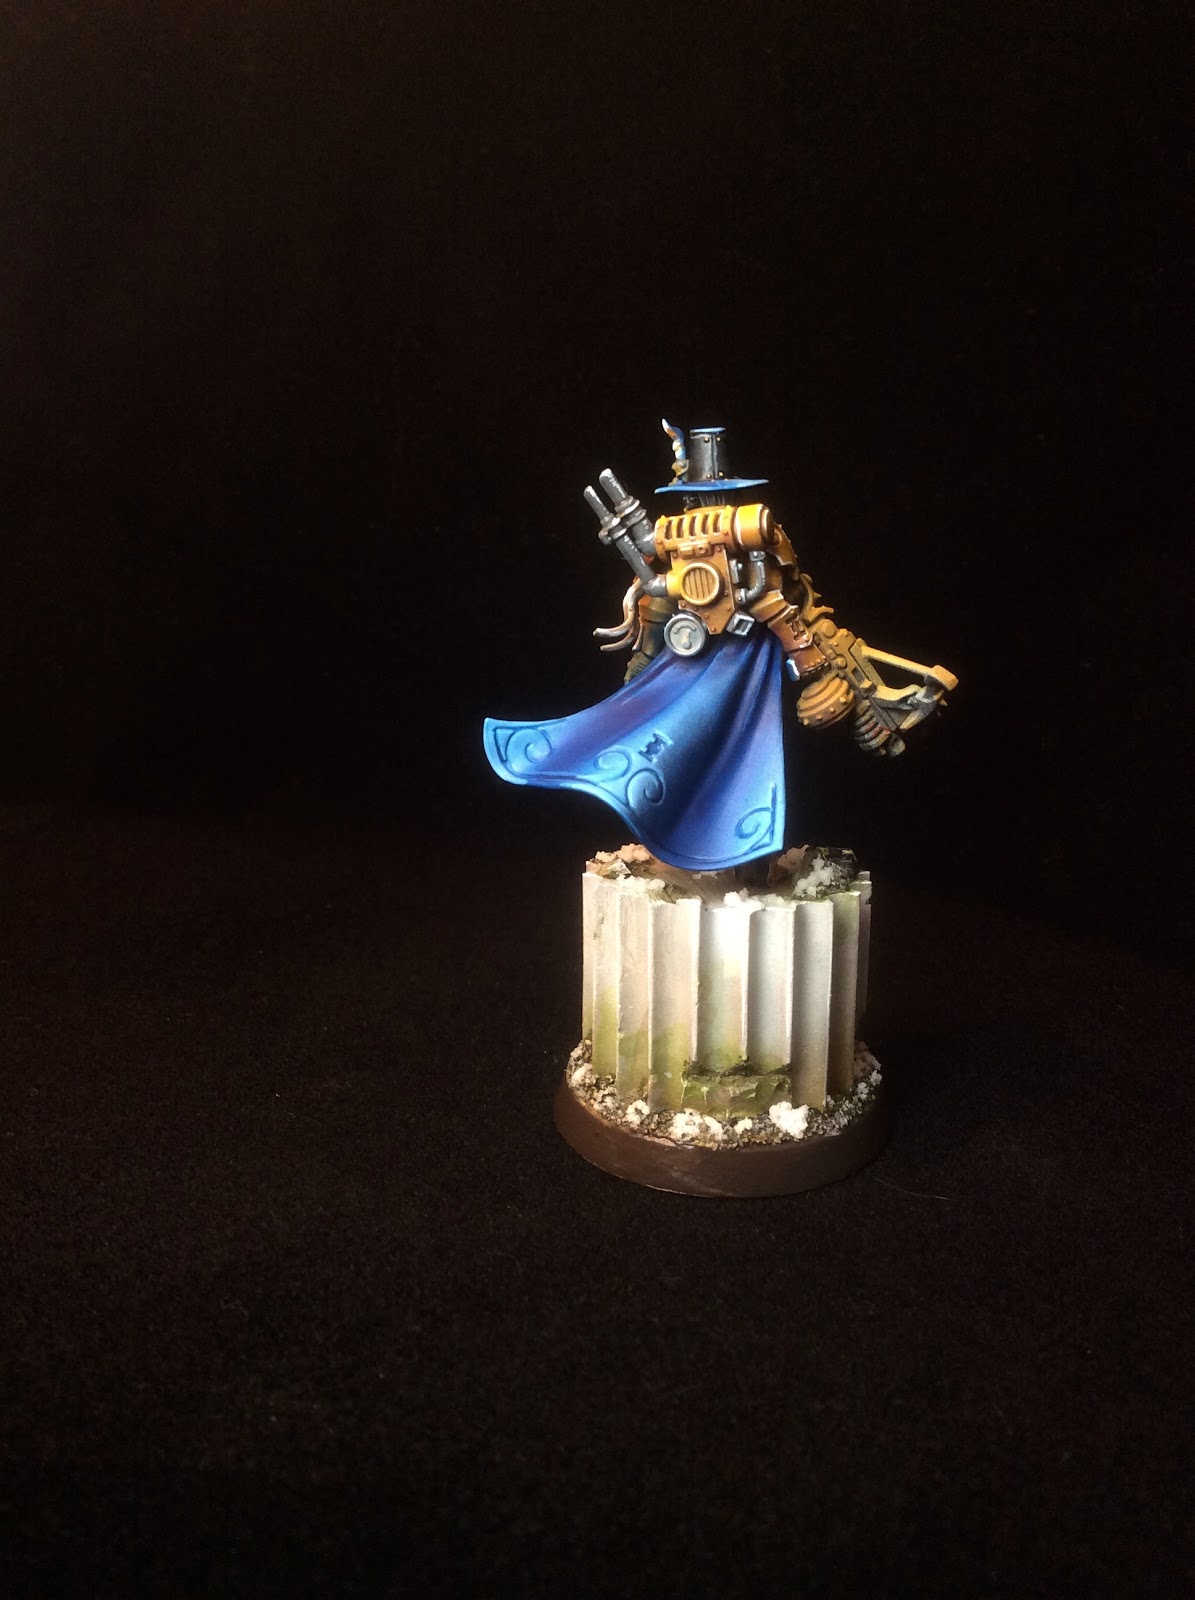
While I'm showing off, I might as well finish up with some work in progress shots of my other rediculous painting project.


I have a headache now...


Don't forget to leave any questions or comments below - I almost always answer, and I'll throw in my two cents on almost any topic/problem. I'll probably also develop this article in time as I personally gain more experience. I certainly plan to update the pictures at some point once I'm finished working on the miniature in question!


Wednesday, 20 July 2016

Rocket Unicycle! - Ork Big Gun Conversion


Ever wondered what it would be like if you mounted a battery of rockets on a unicycle? Well I have, and here's the conversion that answers that conundrum.


The crew form a sort of diorama I like to lay out behind it that makes it look like they're chasing the thing. The captain's hat is from an Imperial Guard tank crewman and yes that Squig does have a rocket in it's mouth.

They see me rollin', they hatin'
Patrollin' and tryna catch me ridin' dirty
...

The best part? the whole thing was made from spare junk I had in my bitz box; in essence meaning it was free. Take that soaring GW prices (I do like the new kit, but at £28 for a single Mek Gun, the price is actually prohibitive for me - I mean that is the same price as an entire unit of 3 Killa Kanz!).

It matches the theme of the Grot Army quite well too, being quite tall and gangly looking!

Did I mention that I won a 500 point army painting competition with the Grot Army? As I found the pictures earlier today, I'm adding them to this post. It did help that the force is rather huge at 500 points! 


Some people have said that the "Big Gun" looks a little too phallic - what with the soaring rocket shaft and twin rocket-balls, but I say it isn't phallic enough! To that end, I've added some creamy-white snow. Just let your imagination run wild...


Thursday, 21 April 2016

Salute 2016 - Painting Competition Entry

So last weekend I went to Salute in London. For those who don't know its the UK's biggest independent wargames convention.


A few determined blog readers might remember that I was preparing something for the painting competition, but with a huge bust and not much time it was looking like a tall order. The good news is that I finished in time for the completion, the bad news is that I didn't really have enough time to get everything as clean or perfect as I would've liked. I had even less time to paint as the conversion took so long. My plan was to basically bamboozle the judges with a variety of techniques; airbrush tomfoolery, dodgy OSL, and an unintentionally leaking puddle of resin water. Unfortunately it didn't work and I didn't manage to bag a win, although looking at the hundreds of hours put into some of the other entries I wasn't surprised. Next year I'm going back to 28mm!


I was in good company as a loser though as my favourite entry across all the categories was a White Scars Heresy Jetbike. I thought it was the best thing there, but the judges didn't seem to agree. So a big shout out to whoever painted that thing.


On the upside there were a lot of cool retailers around. I bagged some Vallejo paints that I wanted for a good price. Retailer wise I have to say that Troll Trader was a real highlight for me. I have bought from them quite a few times on eBay, but seeing the jumble-sale like stall covered in great deals was a sight to behold (well it would've been if it wasn't for the perma-scrum around the place as excited hobbyists jostled for position). I picked up some Slaanesh daemons at a great discount - a brand new in box Seeker Chariot for £12 (retail £16) and a box of Seekers for £12 (retail £17.50 - I didn't realise it was such a good deal till I looked it up to write this!). They even had an entire Storm Wing box for £70, that I almost bought just on principle alone.


I was also impressed with the quality of Prodos Games' miniatures, although only having one till was a bit of a bummer, but I'm glad I braved the 20 minute queue to buy some cool stuff . I'll be looking for them in the future to add more to my new Slaanesh based project. I might do a post about them in the near future, so keep your eyes peeled for that one.


There was a lot to see at Salute and as I didn't bring a camera I won't bother listing everything in a never ending stream of bullet points. Suffice to say I recommend the trip into London to really immerse yourself in the Nerdtopia for a day.


The official shot of my entry. How dare the judges side with actual painting skill over boobies!


The work in progress picture, Space marine for scale purposes - no wonder I struggled to finish!
PS. She also likes the Visual Kei band "D" from Japan, as shown by her well guarded autographed photo.