Wednesday 30 March 2016

Farewell Bretonnia - The legend will never die


Did you hear the news? Bretonnia are about to be removed completely from Warhammer. When I heard I couldn't help but take a look back at some of my old models and at an army that will always have a special place in my heart.

They were some of the first models I ever had - perhaps the very first as I had the good fortune of coming into this hobby right at the start of the 5th edition. Together with my brother I got the box set for Christmas, and roughly 20 years later I can say that neither of us really ever looked back. At the time I played with the Lizardmen and my brother had just started collecting Dwarves (due to a birthday present mishap rather than design- as who actually likes dwarves). This left the Bretonnians as a third army - one we loved to fight. I've probably played several hundred battles against these models - they were there when I first learned how the "fear" rule worked, it was their remains that were found at the feet of my first Steggadon, they were the unappreciated masses and for that I salute them.

The proud men of Bretonnia were also a testing ground for both of us - their grey plastic was ravaged by dozens of coats of thick sloppy paint, and their armour shone with the light of only mythril silver. They were also suitably converted in line with their new finery. Look below for some fine examples of these luxurious pieces:

An old Beastman fist on your head looks like a Grail right? I'll complete the motif by gluing paper grail shapes all over him .... Grails are orange too right? I'M THE GREATEST CONVERTER EVER!!! Taste my huge space marine knife lance!


Peg Leg in all his glory


Finally, I can only look back with misty eyes now that they're almost gone. I was there from the beginning until the end and it's been one hell of a journey... Lance formation one last time just for me guys!

Well that was sad, anyone want to buy some fugly OOP models for way too much money? (That guy with the grail must be worth like £100 on eBay any day right?)

Brown?  I didn't miss with the paintbrush - it's called shading dumbass


Salamanders Bike Squad


One of my more recent 40k armies is a fast attack oriented Salamanders force. I know it might not be the most characteristic thing from a background perspective, but a focus on high quality flamers and plenty of melta weaponry combined with manoeuvrability was a tempting thing. I also have a rule about new armies - they have to feel/play differently than something I already have. Being as I have a large mostly shooty Chaos Marine army (Emperor's Children), my loyalist force would have to be different - with plenty of units Chaos can't have. For that reason I chose fast attack - as I could have plenty of Land Speeders/Storms and really enjoy a different style of play.


Anyway, in this post I've got some pictures of my finished bike squad. I'm particularly happy with the banner that I salvaged from some Militarum Scions that weren't using it!


The bikes themselves are converted from the Dark Vengeance ones - you just can't beat the price compared to the real thing!


Sunday 27 March 2016

Replacing Orks in an all Grot army


When I first started my all Grot army I knew that there would be one place in the force where the inclusion of Orks would be unavoidable; Runtherdz. I needed to create a model that would have the weapons of a slaver, and would be an obvious proxy. In the end I created "Cybork Riders" using a selection of spare parts (like most of the army, converting with green skins is a free form pleasure!). For this model one of the legs and a large portion of the body is actually a burna, combined with a burna boy head that I got from the bitz box at my local hobby store. I also used a few spare stikk bombs as the make great robotic looking parts.


I really like the tall gangly look - if only it didn't make them so vulnerable in games!

Friday 25 March 2016

Grabbing a Nice Bust Part 2!

Hormones rage and innuendos abound in the second part of Tabletop Apocalypse's Bust Saga.

In the last episode we established what it took to make a nice bust - shapely, well formed, and certainly of a good size! In this episode we'll be catching up with my on-going project, so strap yourselves in and prepare to plumb the depths of some beautiful busts.

Those who read the previous article will know that it ended on a mostly postman related cliff-hanger (as I was waiting for delivery). Well the parcel has arrived and I now have my package firmly in hand .... that didn't sound right, I mean I've got my hands on my junk, ... my junk on a nice bust, yeah that'll do. Anyway, with the wait finally over there was nothing to do but spread it open and enjoy the goodies.

One thing was clear from the beginning; I was dealing with a very well formed bust. In fact the quality was high enough that I resolved to build and paint her to a competition standard. I was also certain that I wanted to follow through on the sci-fi theme.


The conversion begins in earnest

With my goal in mind I raided my blitz box for some suitable junk to slap on that bust (Man these innuendos are getting a bit strained). I added armour in a few places as well as other sci-fi looking details. I also decided to go sort of "Ghost in the Shell" with the styling.
Space marine for scale purposes.

One other thing was clear - I was dealing with a seriously big bust; something I could really get my hands wrapped around. In turn that would make it different than anything else I've ever painted. I've decided to try and finish it for Salute in London - where I will probably enter under the miscellaneous category- which gives me about a month of painting time. Unfortunately for the blog, I'll be keeping the final build under wraps from now on until the competition, so those crummy work in progress shots are all you're gonna get! (I know it's really gonna burn for the 20 or so people that will read this article. To appease my adoring fans here's a picture now it's in paint (I'm still not giving much away - playing it close the the chest you might say...)


Saturday 19 March 2016

WAAAGH Makari!


The 2nd edition legend returns and this time there will be blood!

When I first started working on my all grot army for 40k I had a epiphany of sorts. The army needed a leader, someone with pedigree and class. There could only be one contender - the only gretchin special character to ever exist - Makari. Back in 2nd edition he was Ghazghkull's banner bearer and his only power of note was a 2+ invulnerable save attributed to the favour of the gods, or perhaps just dumb luck. When the new model for Ghazkull was released Makari disappeared from the game and the background and into oblivion - except for a short piece of text that said that Ghazghkull sat on him and subsequently fed him to a squiggoth.

Makari in 2nd edition.
Clearly this wouldn't really be enough to kill the legendary Makari. In my version of the history he escaped death by fleeing in an old suit of Ghazghkull's Mega Armour. Through blind luck he rebuilt himself as more machine than greenskin and then began to lead a colossal Waaggh of grots against their oppressive Ork masters. Also he had become quite clearly insane after his transformation!

With these fanciful ideas in mind I bought the first model for my grots - an old metal 2nd edition Makari. I then did some fairly heavy conversion work to mash him into a suit of Ghazghkull's armour. For sheer comedy value he also had to be outrageously big, so I added more armaments to the already bulging suit of armour and finally a scenic base to make him even taller!

After a few coats of paint the mighty Mekka Makari was finally finished and ready to bring the a 
gaming world to it's knees.

That's one big Grot!

Da Lucky Stikk makes a comeback. This time with Makari's personal heraldry.


Thursday 17 March 2016

Imperial Fists Vindicator Laser Destroyer


I recently finished painting a Laser Destroyer for my Heresy Imperial Fists force. Taking inspiration from the background I wanted to make a footslogging infantry heavy army, but it still needed some solid anti-tank for backup. That and a Vindicator is pretty much the most Imperial Fisty tank there is!


It helps that the thing is a monster on the tabletop too. Running in it's overcharged mode it fires 3 BS4 twin-linked S9 AP1 Ordnance shots (so they re-roll hits and armour penetration and then add 2 to the vehicle damage chart!). It's about the only thing that will have an Imperial Knight shaking in it's giant metal boots!


Painting wise it was the first vehicle that I've ever done with a white undercoat which was a bit labour intensive, but there's just something impressive about bright colours on the tabletop.


Wednesday 16 March 2016

Emperor's Children Converted Noise Marine Champion


I created this model with the idea of a Pre-Heresy Lucius the Eternal in mind. Admittedly it was only loosely based on him; I mostly just let my imagination run wild. Anyway, I use him as the Aspiring Champion for my Noise Marines - equipped with a power sword and Doom Siren.

The body is a Forgeworld Sons of Horus Reaver. His sword is from Hector Rex and the Bolt Pistol is from the plastic Raptors kit. The cape is a cut down piece of Chaos Warrior cape and finally the head is actually the bare head from the plastic Eldar Guardian Squad with more hair modelled using greenstuff.


For more photos of the rest of the squad find them here.


Tuesday 15 March 2016

Heresy Imperial Fists Tactical Squad


My recently completed Imperial Fists tactical squad. I really wanted to get a good strong yellow for these guys. I know that these days people tend to go for a murkier battle worn look, but I always loved the old 2nd edition canary yellow colour, so I was determined to make them so bright you had to wear sunglasses to look directly at them!


The trick to getting a strong smooth yellow wasn't as hard as I thought it would be - simply undercoat with white spray and then apply about 3 coats of your chosen yellow. I thinned mine with about a third medium to avoid any of the clagginess that you can get with citadel's lighter colours. The only problem is that you then have to painstakingly black in all of the other details on the model, but the results are worth the effort.

I'm looking forward to finishing off more of the army so I can get some battles in!


Monday 14 March 2016

Grabbing a Nice Bust!


I think I need to get something off my chest and really get abreast of this issue. You see that picture up there, well it's one of the best paint jobs I've ever seen hands down, but get ready to be disappointed - it was a limited edition from some company called "Gigantic Miniatues" who only made 50 of them - and don't bother looking on e-bay either as I already did.

Unfortunately for my wallet, just seeing the picture was enough to light a fire in my hobby pants. After painting so many 28mm models I just had to get my hands wrapped around something bigger, so with that in mind I pushed the generous mounds of hobby crap off of my table and embarked on a new adventure to unknown lands.

That's one nice bust!
I'm also blaming this new obsession on Angel Giraldez's Painting Miniatures from A-Z as it was the busts featured therein that first made me want to grab a bust of my very own (and led to several questionable bust related image searches that eventually ended in me finding this mini in the first place).

There was just one small problem with my plan - most busts are horrible!

This isn't the bust I dream of...


Some busts were so bad I had to remove the images....

After trawling the internet for a span of several minutes I realised that I was after a specific kind of bust and not just any bust would do. I mentally created a list of factors and narrowed my search criteria:

  1. First of all the bust had to be well formed (writer's note - I'm running out of boob related joke material, better go watch Dude Where's My Car to get back in the zone). This factor also included not being Fugly, or some kind of historical berk.
  2. Obviously only a female bust would do - and I had a real reason too (honest it's a good one). I wanted to attempt some airbrush work and a female face would be a lot better for smooth blending that than some craggy dude.
  3. It had to be tasteful - this thing will probably end up on display somewhere, so no actual nudity (and if you're wondering why that might be an issue, just try looking at busts on the internet for a while).
  4. It didn't necessarily have to be a bust - what mattered most was the larger scale, so I also looked at some larger scale miniatures too.
  5. A sci-fi theme would be preferable as I wanted to try using a stencil to get that hexagon effect seen on the unobtainable "Hush" by Gigantic Miniatures.
It was during this search that something occurred to me - I didn't actually need to meet all of the points above - I could convert the bust to be more science fiction oriented. The only thing holding me back was my own skill level, which means that basically as long as I didn't have to sculpt large portions of it from the solid I'd be fine. After I realised that I cast a wider net and finally found a bust I would be proud to spray with the sticky white stuff (undercoat - get your mind out of the gutter!).


So here we are - a bust of Luz from Malefic (apparently). It basically ticked all of the boxes other than the theme, but wouldn't be too hard to adjust (OK it would take some work, but that would be a lot of fun in itself). Being as it's 2/3 of her body already I figure I might as well get some legs on her too as I go. It should be quite a project to work on.

I also found a company that makes airbrush stencils with a hex grid (Anarchy Models), so my dream was getting closer by the minute.

With that the first part of my quest came to an end. Now to wait for the postman and dream of the things I could do to a woman's bust! ... errrmmm I mean a bust of a woman.....

Check back later for the second instalment of this exciting saga - and you were probably thinking there wouldn't be anything this exciting till the next series of Game of Thrones was released.


Disclaimer: I don't own any of these pictures, nor are they my own work. Copyright held by their original authors and all that.


Sunday 13 March 2016

Infinity Domaru Butai


My latest painting escapades. This time I've been busy painting my first Infinity Yu Jing model - a Domaru Butai. It is actually the first time that I've painted orange as a main colour and not just as an accent. To achieve a strong orange colour I used a basecoat of Vallejo grey primer, followed by a coat of Vallejo Hot Orange. I then highlighted with orange fire and sun yellow before adding a final highlight delicately with a mix of sun yellow and white. I then switched from the airbrush to paintbrush and edged the armour with Yriel Yellow. Now I just have to paint the rest of the army.....


I'm still not sure about the base - I might edge the whole thing in black.


Friday 11 March 2016

How to Paint Ultramarines Primarch Roboute Guilliman

Painting faces can be difficult, but I'll give you some pointers.

I recently painted Roboute Guilliman - Primarch of the Ultramarines as a commission. I have a few work in progress pictures as well as some of the finished model and in this post I'm going to do a step by step walkthrough of how I painted each colour and also detail some of the techniques used.

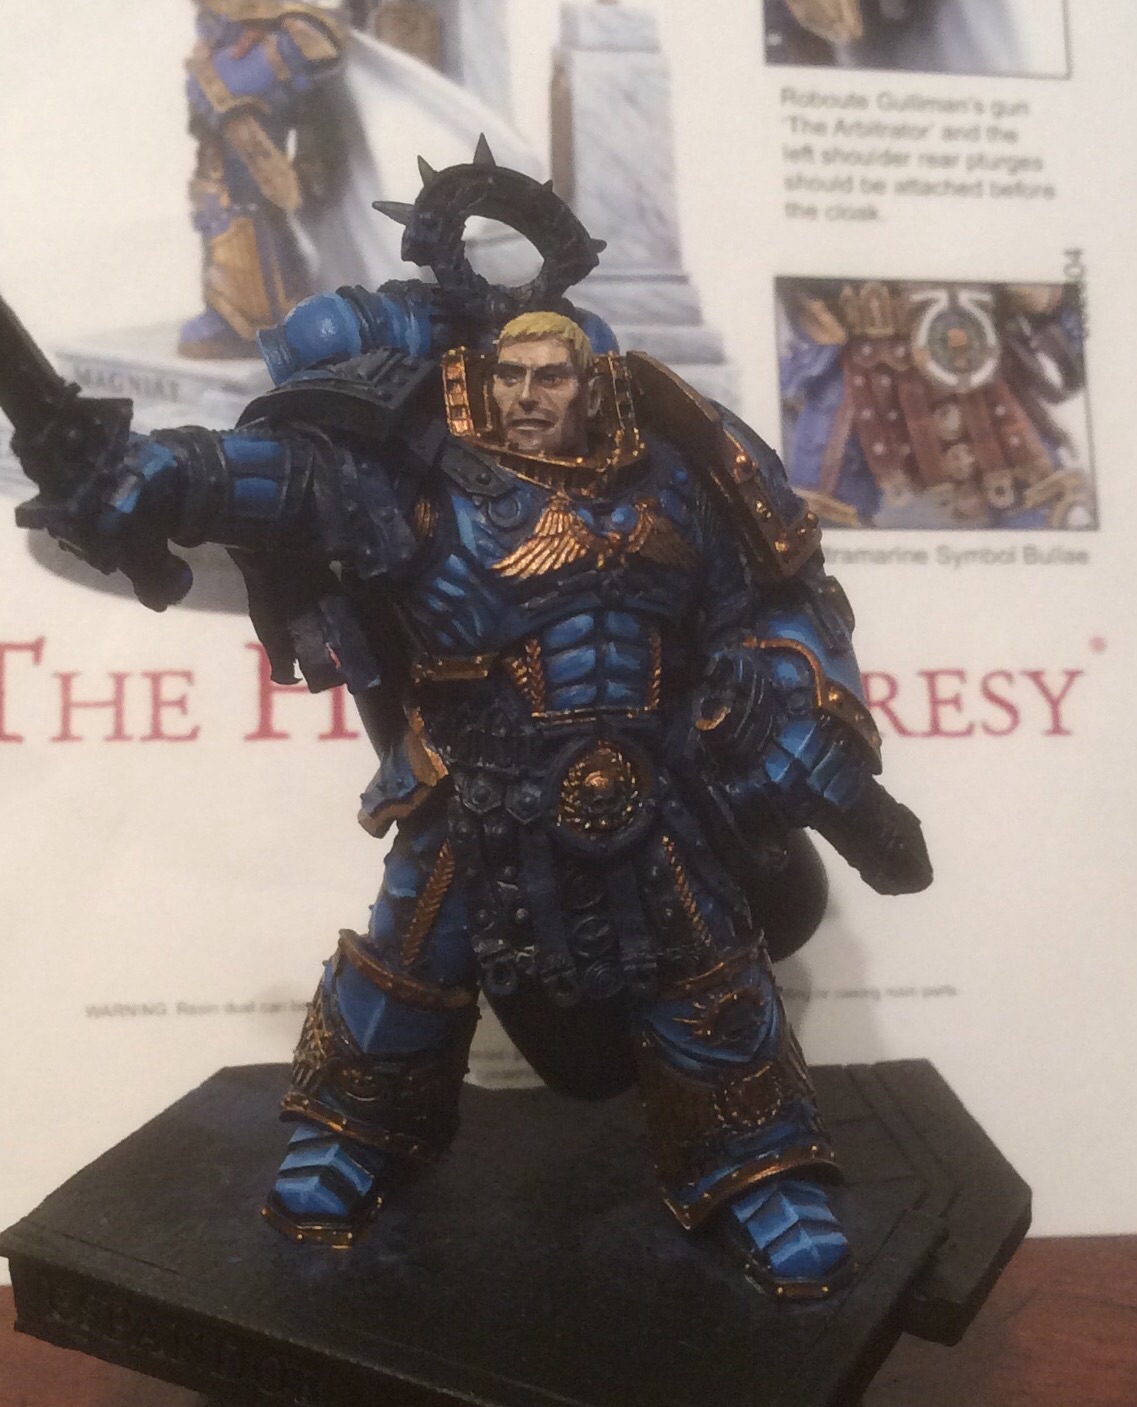
In this first picture you can see the finished blue colour of his armour as well as a basecoat on the gold details. I also painted his face. Needless to say the first step was an undercoat with Chaos Black Spray before the painting could begin. 

I'll start with the easy stuff - The armour was basecoated in Macragge blue. I then applied a generous wash of Kantor blue and left it to dry - this gave me some basic definition on the shapes. For these first 2 steps I recommend using a very large brush - no need to worry too much about accuracy as long as the paint is still applied thinly. I then began highlighting the edges of the armour with a small layer brush using a mix of Macragge Blue and an old Ultramarines Blue (Altdorf Guard Blue these days). I then applied a finer highlight of pure Ultramarines Blue and finally a very fine edge highlight of Ultramaries blue mixed with White Scar. With those steps the Blue armour was complete.

After the blue was complete I began the painstaking process of picking out all of the Gold detail with Brass Scorpion. This brings me to my number 1 tip for painting gold - never actually paint gold, use brass scorpion and then highlight up! Anyway, I applied a coat of brass scorpion and then when it had dried I washed all of the gold areas with Rhinox Hide to define the detail and provide a nice tonal variation when it was finished. In this stage I was careful not to get the brown wash on my finished blue armour.

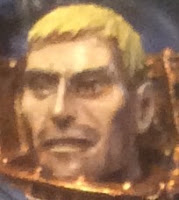
For the face I used a mix of Rakarth Flesh and Bestial Brown, washed with Rhinox hide and then highlighted successively with a mix of Rakarth Flesh, Bestial Brown and white. Unfortunately I didn't do step by step pictures, but if I had it would've looked like a mess for most of the process. The most important thing with faces is to keep going till you're happy with the result and to keep the paint thin. As long as the paint is thin you can always adjust the tones and keep going without losing detail!

On the subject of faces, here are some hints you can apply to most models:

  1. Keep the paint thin, it's going to take a lot of coats!
  2. Don't paint the eyes in pure white - it's too stark and often leads to that googly eye effect, use an off white like Pallid Wych Flesh (or just mix white with a speck of brown). 
  3. If you're painting pupils in the eyes, make sure they go from the top of the eye to the bottom and don't float in the middle as pinpricks look strange on humans (but may work for aliens etc)
  4. Use a wash to gain definition around the eyes and mouth before you start highlighting.
  5. If you want to get a stubble effect on the face, or shaved head use a glaze of brown/grey in those areas - keep the glaze thin though as it's easier to do multiple coats if it is too light. A glaze is like a wash, but using medium (like Lahmian Medium from GW) - medium is essentially everything in your paint except for the pigment. By mixing it with regular paints you create a very thin layer of pigment that colours the surface, as opposed to a traditional wash which falls into the recesses and tends to stain blotchily in open areas.
  6. For female faces make the highlights smoother and less sharp - this makes the faces softer and more feminine. You can also add glazes to simulate make-up, but go easy on them unless you want her to look like she rolled straight out of a brothel and onto the battlefield!

A few more coats of paint, stone effect looks good!


So I've jumped forward a bit again, but don't despair, most of it is relatively simple and I'll tell you what I did with the stone effect in a minute!

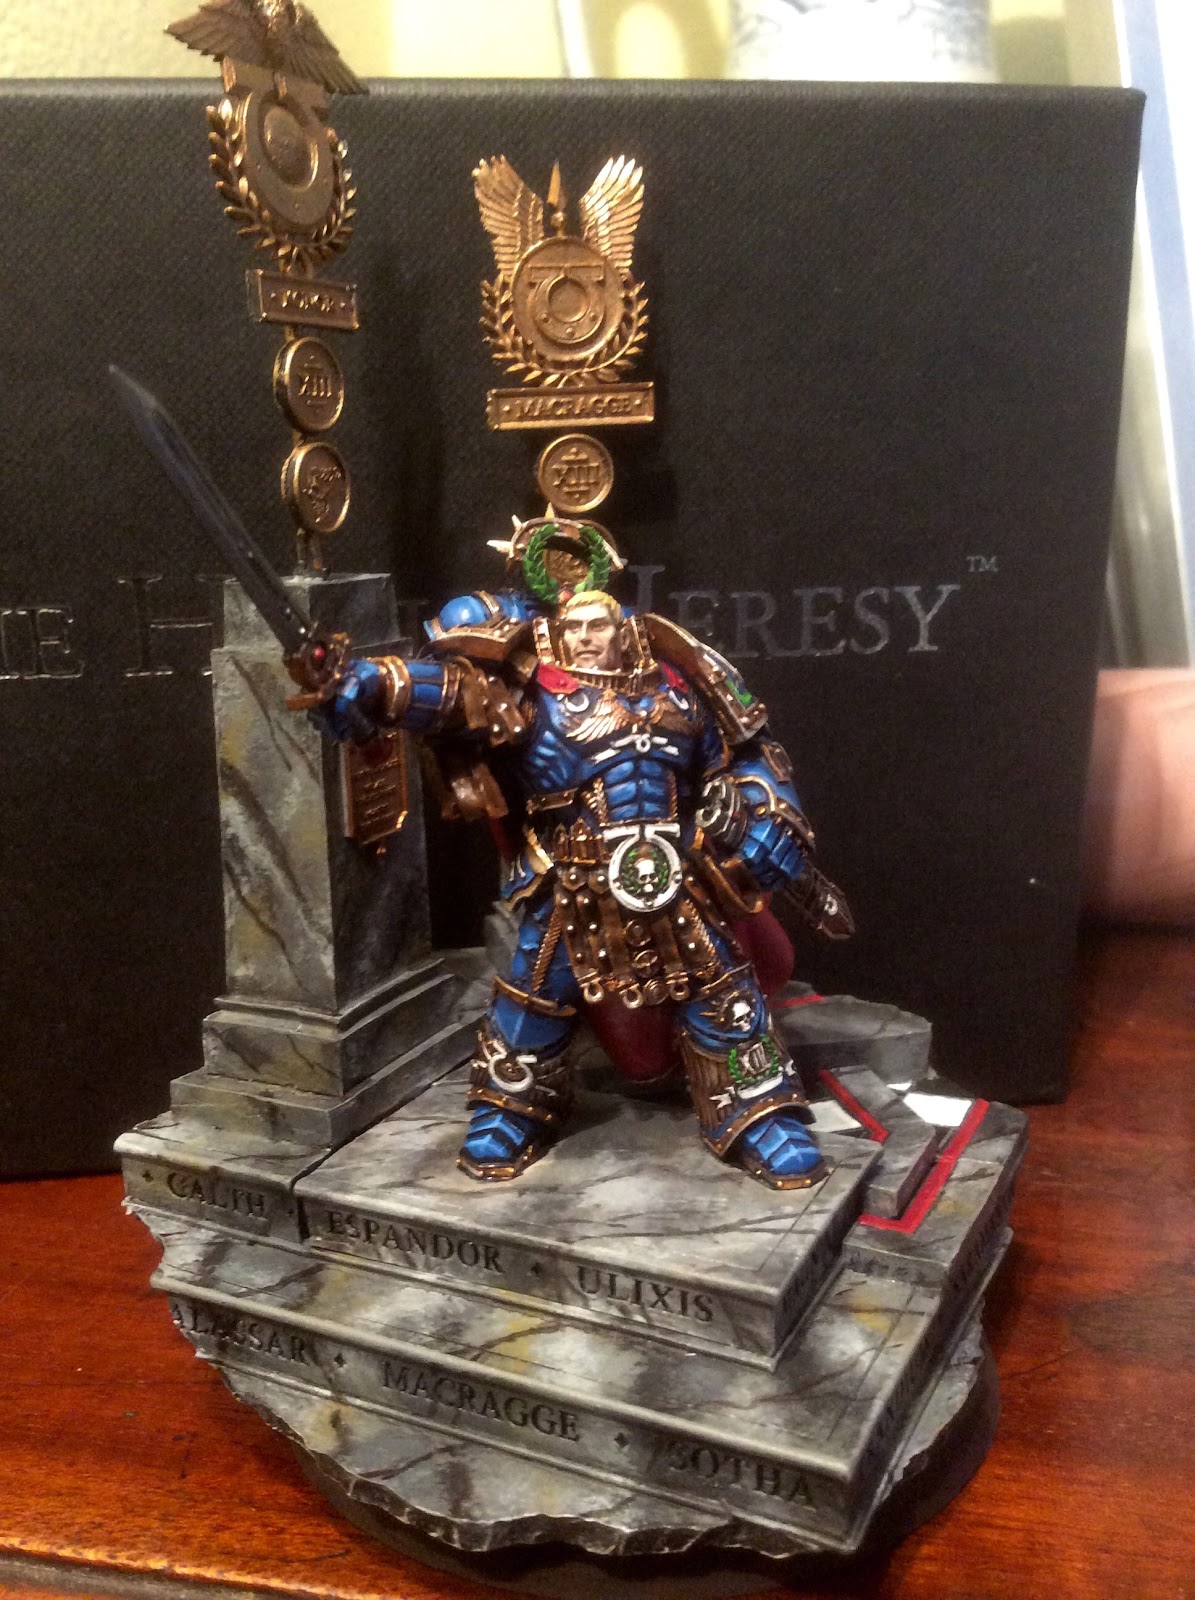
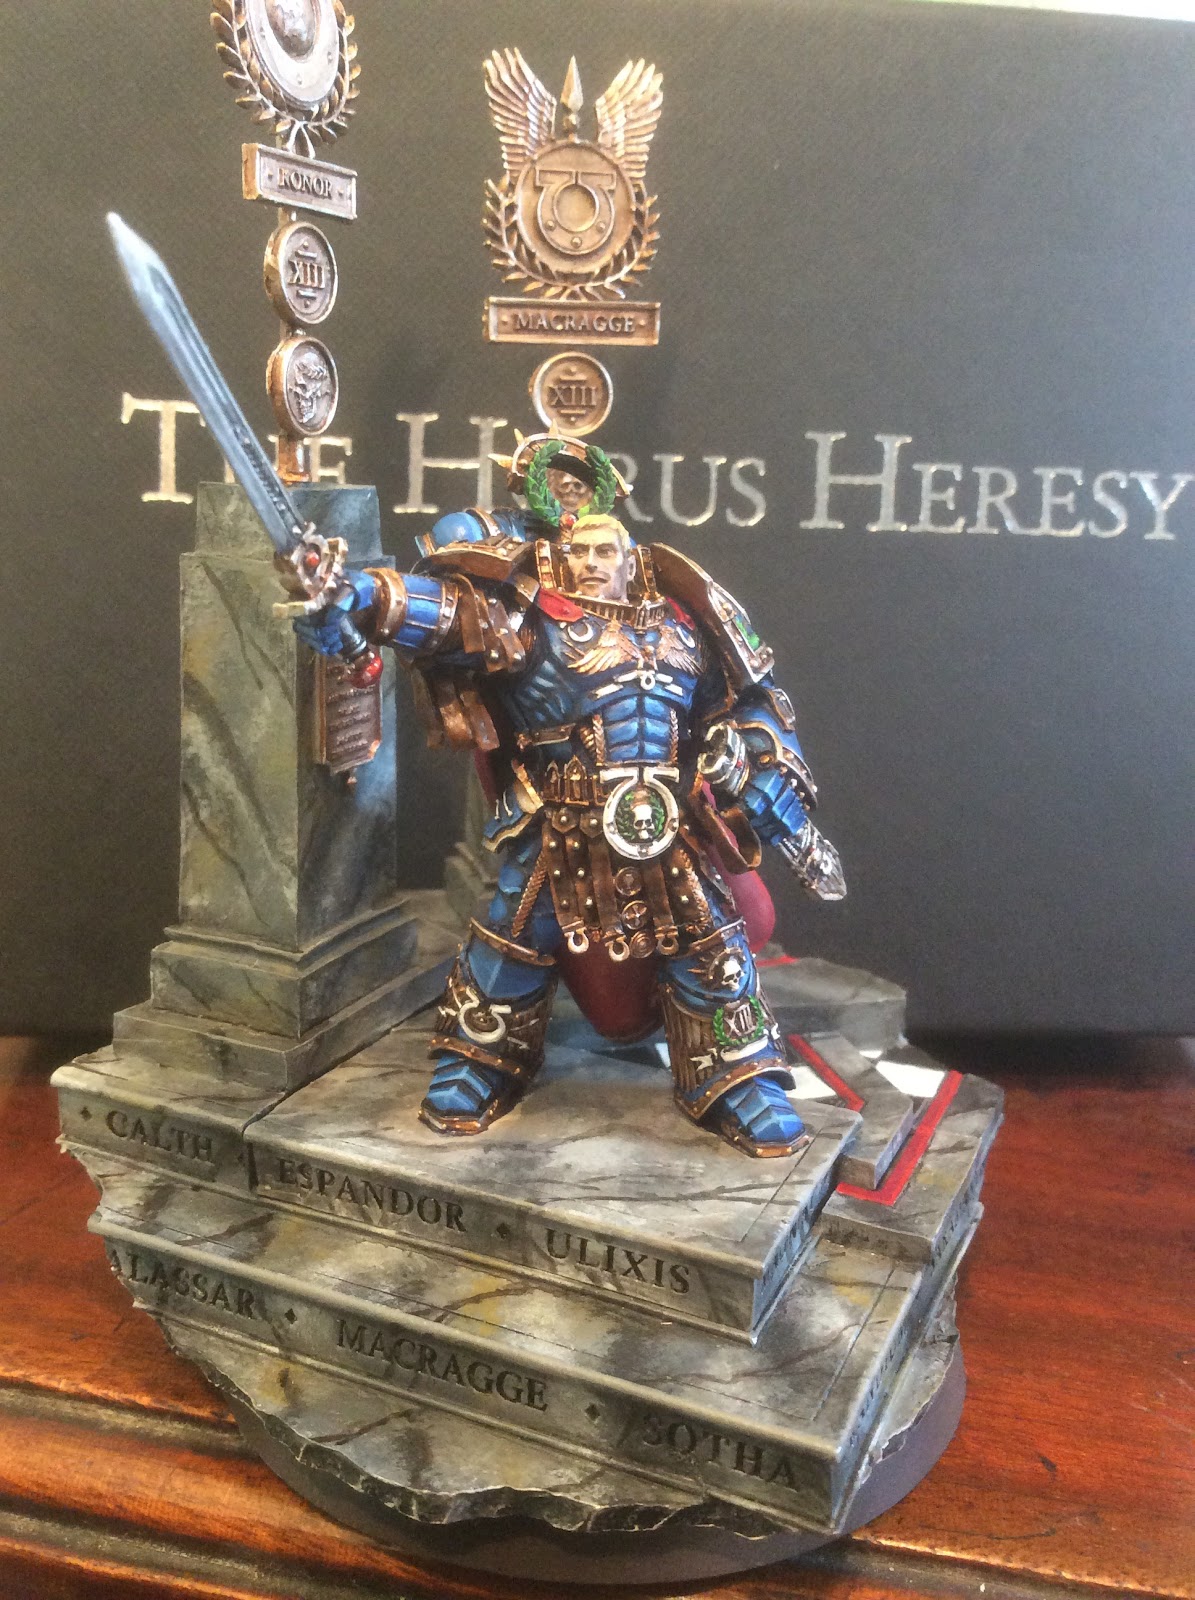
The next step after the armour and the face was to finish off those gold areas I was working on. To do this I highlighted most of the area of the gold with a mix of 50/50 Runefang Steel (Mythril Silver) and Brass Scorpion. I added more Mythril silver to the mix and did a second layer of highlight, but covering a smaller area. Once it was looking good and gold I applied an edge highlight of pure Mythril silver to get a nice shine and really bring out the details.

The white details were basecoated in Rakarth and then washed with Nuln Oil (black wash). This gave me a good base to work over. I then Highlighted about 90% of the surface area with Ulthuan grey before adding a final fine highlight of White Scar.

The laurels and other green details were basecoated in Caliban Green before being highlighted with Warboss Green and finally Moot Green. I then applied a shade with Biel-Tian green, before re-highlighting the edges with moot green.

For the red cloak I used a basecoat of Khorne Red and then highlighted it with a mix of Khorne Red and Evil Sunz Scarlet in layers progressively adding more of the Scarlet until I reached a pure Evil Sunz Scarlet highlight. I then added an edge highlight of Troll Slayer Orange. If you over highlight you can add a glaze of 50/50 Khorne Red and Evil Sunz Scarlet to the offending areas to bring the colours back in line.

The leather details were basecoated in Rhinox hide and then highlighted with Bestial Brown. I then applied a fine highlight of Bestial Brown mixed with Bleached Bone, before washing down again with Rhinox Hide.

With the Primarch himself  taken care of it was time to focus on the display base. I wanted to change the colour from the blue-white one on Forgeworld as I think the light colour draws the eye away from the model itself and my personal painting style is a bit more grizzly looking anyway. That and I wanted to get away from how Roman he looked (hence the stubble)!

With these thoughts in mind I tackled the base. For simplicity I'm going to bullet-point the steps below to show how I painted the stone surface:

  • Basecoat with Codex Grey.
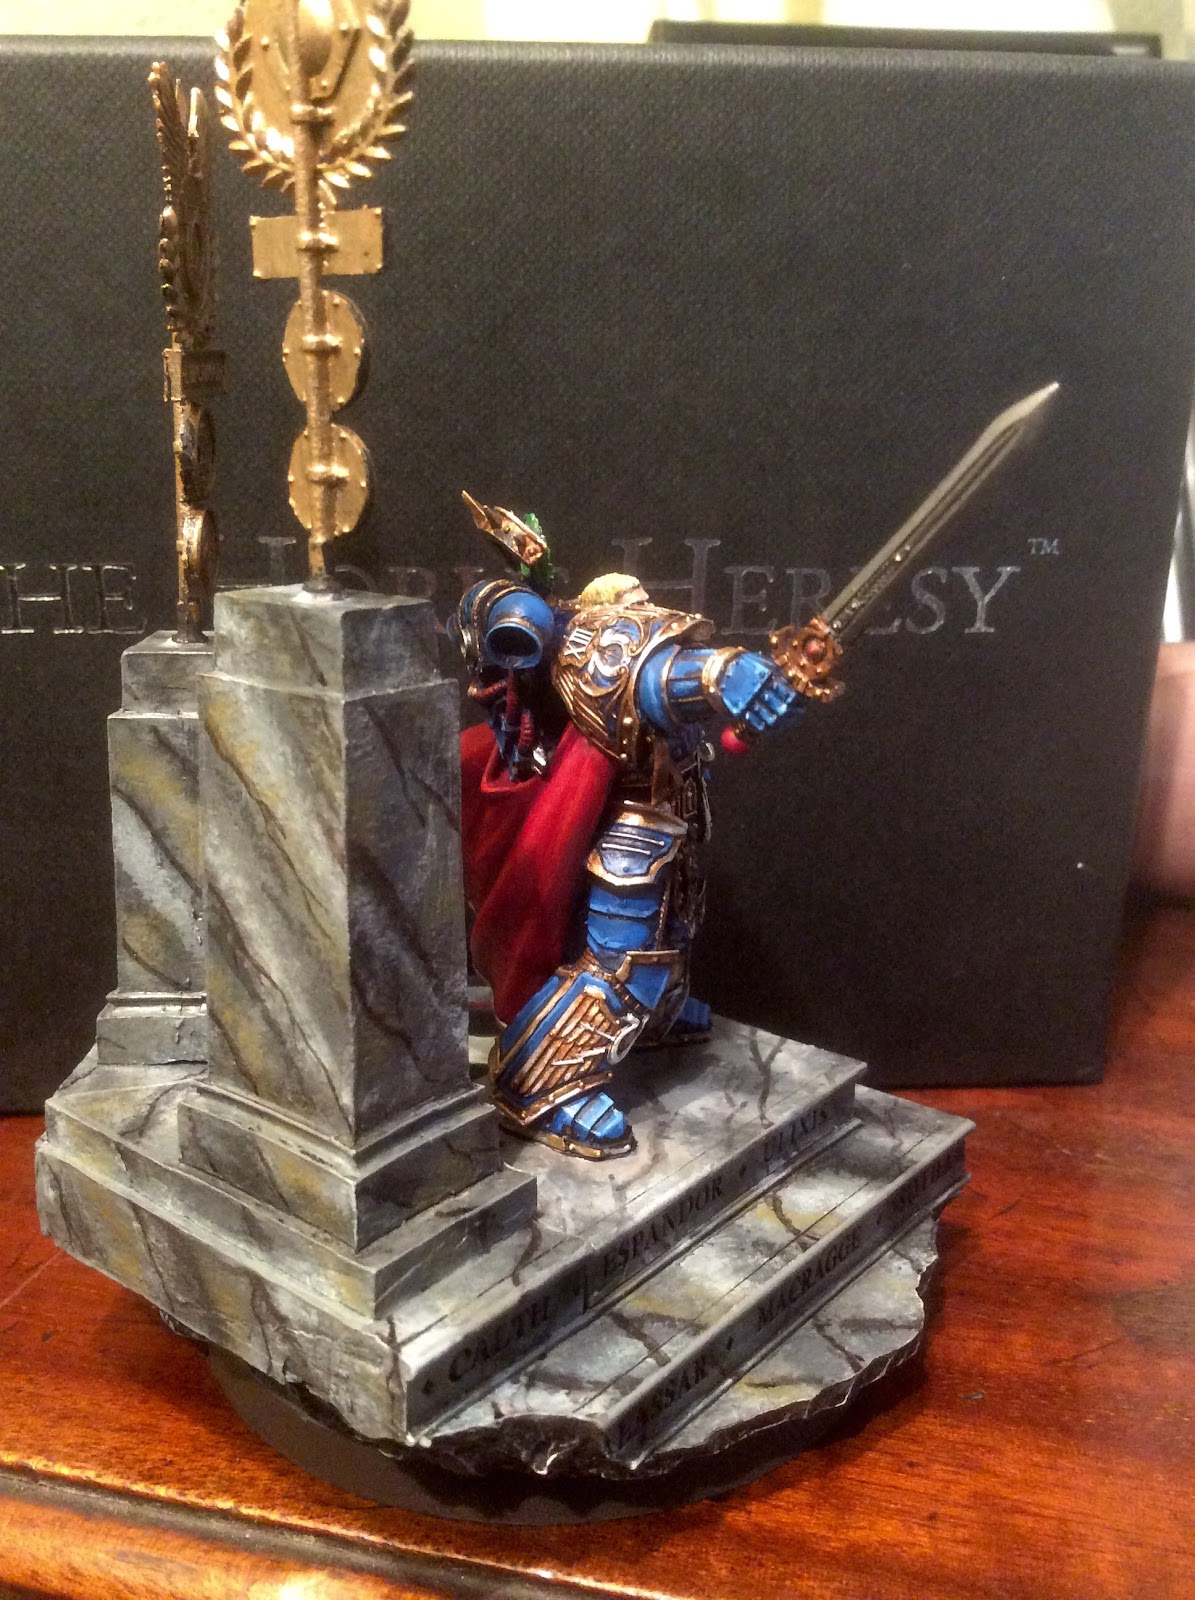
  • I stippled the surface using a selection of tones, which I will describe in a minute. For this I recommend using a large brush that you don't mind damaging. I used a cheap square ended brush that was about 10 times the size of a Citadel "standard". If you look closely at the pictures you'll see two things in the stone - black veins and beneath them a varying pattern of different grey hues. Well, in this step we're creating those varying grey hues.
  • During this technique it's important to consider where your lines are going. If you look closely at the pictures you'll see that those grey shades are all lines going in one direction and that this continues as they go round corners - this makes the effect look a lot more believable and realistic and is something to consider as we go forward.
  • For all of these colours I simply took the base colour (Codex Grey) and then mixed in a small amount of another colour before stippling in straight lines across the base, being careful to be consistent around the corners. It is important not to make the colours contrast too starkly, but still enough that it won't make smooth blends - we need it to look textured!
  • The colour I mixed with were: Abaddon Black, Mechanicus Standard Grey, Ulthuan Grey and finally some Balor Brown to give the colour a bit more interest.
  • After the stippling was finished all that was left was to paint the veins. I ran a fairly thick glaze of Abaddon Black in fine lines across the surface; being careful to follow the grain of the stone that I had established in the previous step. I used a glaze just to make the paint a bit less harsh and slightly transparent in parts so it would blend well with the effect I had already created.


When painting stone make sure the "grain" flows together

After all of that excitement I finished the gold details on the base the same as earlier and finished off the remaining details. All in all Guilliman probably too between 10 and 15 hours from start to finish.

If anyone has any questions or wants to attempt the same scheme leave a comment below!